photoshop如何做出镂空字体
时间:
国柱790由 分享
photoshop如何做出镂空字体
我们经常会在一些海报,平面上看到一些个性的字。这些用PS就可以做,那么大家知道photoshop如何做出镂空字体吗?下面是学习啦小编整理的photoshop如何做出镂空字体的方法,希望能给大家解答。
photoshop做出镂空字体的方法
学习啦在线学习网 1、点击文件工具栏,选择新建,并创建一个600x300的文件,点击好。

photoshop做出镂空字体步骤图1
学习啦在线学习网 2、点击文字工具,把文字的大小设置的稍微大一些,然后在文件中随便输入几个字。

photoshop做出镂空字体步骤图2
3、依次点击图层—文字—转换为形状,得到下图效果

photoshop做出镂空字体步骤图3
4、点击软件左边栏中的路径选择工具,然后在文件中从左上开始拉向右下,直到把文字全部选取。

photoshop做出镂空字体步骤图4
学习啦在线学习网 5、点击从形状区域减去命令,文件变成如图所示的效果,然后点击文件的空白位置,确认变化效果。

photoshop做出镂空字体步骤图5
6、选择钢笔工具,并选择如图所示的选项,

photoshop做出镂空字体步骤图6
学习啦在线学习网 7、在文件中绘制如图所示的几个点

photoshop做出镂空字体步骤图7
8、选择路径选择工具,可以把文件中的字母任意的拖动上下或者左右。

photoshop做出镂空字体步骤图8
学习啦在线学习网 9、单击图层面板中的缩栏图,把多余的部分隐藏起来,如下图效果

photoshop做出镂空字体步骤图9
学习啦在线学习网 10、点击右下角的像F一样的工具,选择投影,设置距离为8;选择外发光,设置不透明度为50,大小为1,然后确定。
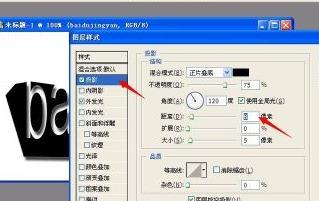
photoshop做出镂空字体步骤图10
11、点击右下角的像F一样的工具,选择投影,设置距离为8;选择外发光,设置不透明度为50,大小为1,然后确定。
学习啦在线学习网 12、然后新建一个文字层,随便输入几个文字。按住刚做好的效果层不放,把它拖到新建的文字层下方,这时新建的文字层也同样有设置的效果了。完成。
学习啦在线学习网 看了“photoshop如何做出镂空字体”的人还看了: